Make your first Shader Forge plugin
You'll build Neon Pulse, a plugin with three effects (a traveling glow, stripes and a wobble), a preset, an app theme and a one-click command. No build tools are needed: a plugin is one text file.
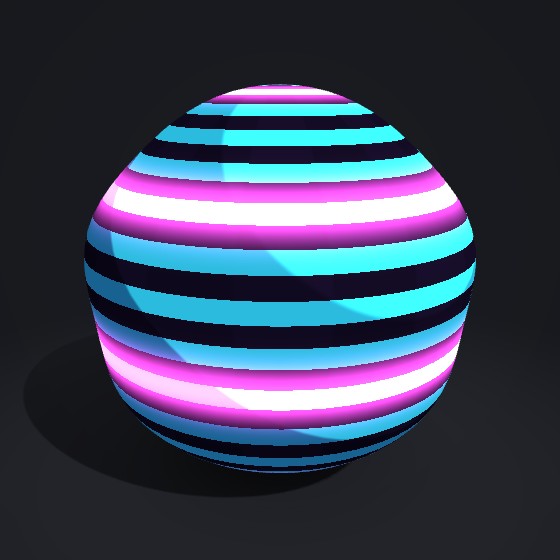
The "Neon club ball" preset from your own plugin, running in the live preview. Its effects export to Built-in, URP and HDRP like the built-in ones do.
1What a plugin is
A plugin is a single .xsfplugin file. Inside is JSON (the same format as a .json file) that can add any mix of:
| Part | What it adds | Where it shows up |
|---|---|---|
| Effects | New switchable effects with sliders, written in a few lines of shader code | The effect list, under your own category |
| Presets | Ready-made shaders (lighting, blend mode, effects and values) | Presets window and command palette |
| Themes | Colors for the app itself | Settings › Look |
| Script | Commands written in JavaScript that change the shader for you | Plugins menu and command palette (Ctrl+P) |
Effects, presets and themes are pure data, so they're safe to share. A script runs code inside Shader Forge, so script plugins start switched off, and the Plugin manager marks them "runs a script".
2Create the file
- In Shader Forge, open the Plugins menu in the toolbar and choose Create a new plugin…
- Type the name Neon Pulse. Shader Forge writes
neon-pulse.xsfplugininto your plugin folder and shows it to you. - Open the file in any text editor: VS Code, Notepad++ or plain Notepad all work.
The new file already works. It contains a starter effect, a theme and a "Say hello" command, plus a _help list that sums up the rules. Delete what you don't need as you go. Prefer to start from scratch? Download the starter file.
The edit loop: save the file in your editor, then click Reload plugins in Plugins › Plugin manager. Shader Forge reloads in a second with your changes, and you don't have to restart it.
3The top of the file
Every plugin starts with a few fields that say who it is:
{
  "format": "xsf-plugin",
  "formatVersion": 1,
  "id": "you.neon-pulse",
  "name": "Neon Pulse",
  "version": "1.0.0",
  "author": "You",
  "icon": "💡",
  "description": "A pulsing neon glow, stripes, a wobble and a matching theme.",
  "category": { "id": "neon", "label": "Neon Pulse", "icon": "💡" },

  "effects": [],
  "presets": [],
  "themes": []
}| Field | Meaning |
|---|---|
format | Always "xsf-plugin". This is how Shader Forge knows the file is a plugin. |
id | A unique id. Use yourname.plugin-name so it never clashes with someone else's. |
name, version, author, description | What people see in the Plugin manager (and in the Plugin Store). |
icon | An emoji, or a small image written as data:image/png;base64,… |
category | Optional. A new group in the effect list for your effects. You can also put effects into a built-in category: color, uv, lighting, glow, pattern, alpha, vertex or stylize. |
4Your first effect
Add this to the effects list. It makes bands of glow that travel up the model:
{
  "id": "neonPulse",
  "cat": "neon",
  "label": "Neon pulse",
  "desc": "Bands of glow that travel up the model.",
  "params": [
    { "id": "_NpColor",  "label": "Glow color", "type": "color", "hdr": true, "def": [0.2, 1, 0.9, 1] },
    { "id": "_NpSpeed",  "label": "Speed",      "type": "range", "min": 0, "max": 10, "def": 3 },
    { "id": "_NpBands",  "label": "Bands",      "type": "range", "min": 1, "max": 20, "def": 4 },
    { "id": "_NpSharp",  "label": "Sharpness",  "type": "range", "min": 1, "max": 16, "def": 4 },
    { "id": "_NpAmount", "label": "Amount",     "type": "range", "min": 0, "max": 5,  "def": 1.5 }
  ],
  "emit": "float npW = 0.5 + 0.5 * sin(t * _NpSpeed - d.uv.w * _NpBands * 6.2831853);\nemit += _NpColor.rgb * pow(npW, _NpSharp) * _NpAmount;"
}
Save, reload the plugins, and you'll find Neon pulse in a new Neon Pulse category. Here's what each part does:
paramsbecome sliders in Shader Forge and material properties in Unity. Their ids start with_and must be unique across all effects, so give them a short prefix (_Np…here).emitis the stage: the moment in the shader where your code runs. In theemitstage you add light to theemitvariable.- The code is HLSL, Unity's shader language. The line
\nin the JSON string is a line break.
Here's the shader code on its own, easier to read:
// 0..1 wave that moves along the mesh's V coordinate over time
float npW = 0.5 + 0.5 * sin(t * _NpSpeed - d.uv.w * _NpBands * 6.2831853);
// sharpen the wave into thin bands and add it as glow
emit += _NpColor.rgb * pow(npW, _NpSharp) * _NpAmount;
Two rules that catch everyone:
1. Write decimal numbers with a dot: 2.0, not 2. The live preview is strict about this.
2. Start your local variables with a unique prefix (npW, not w). All effects share one function, so two effects that both declare w would clash.
5Stages: where your code runs
An effect can put code in one or more stages. They run in this order, per pixel, except vertex, which runs per vertex:
| Stage | Use it to… | Variables you change |
|---|---|---|
vertex | Move or bend the mesh (waves, wobble, wind) | p object position, nrm normal (also vuv, vcol) |
uv | Scroll, twist or distort UVs before textures are read | uv |
base | Change the color right after the main texture is read | col |
normal | Fake bumps and ripples | n |
surface | Tints, patterns, dirt: most color effects go here | col |
diffuse, direct, ambient | Change how light falls on the surface (add "requires": ["lit"]) | the lighting terms |
emit | Add glow, which shows even in the dark | emit |
post | Grade the final lit color (posterize, hue shift…) | col |
alpha | Fade or cut out parts of the surface | col.a, clip(x) |
Things you can read
| Name | What it is |
|---|---|
t | Time in seconds |
uv | Main UV, with the material's tiling and offset applied |
d.uv.zw | The raw mesh UV (0–1). d.uv.w runs bottom to top on most meshes. |
d.posWS, d.posOS | World and object position |
d.normalWS, n | Surface normal (world space) |
d.viewDirWS | Direction from the surface to the camera (great for rims and fresnel) |
d.vcolor | Vertex color |
d.screenUV, d.camDist, d.facing | Screen position (0–1), distance to camera, and 1 on front faces / −1 on back faces |
d.lightDir, d.lightColor | The main light |
6More kinds of settings
| type | Shows as | Extra fields | In code |
|---|---|---|---|
range | Slider | min, max, optional step | float |
float | Number box | float | |
color | Color picker | "hdr": true adds an intensity box for glow colors. "alpha": true adds an opacity slider. | float4 (.rgb, .a) |
vec2, vec3 | 2 or 3 number boxes | float4 (.xy / .xyz) | |
toggle | Checkbox | float (0 or 1) | |
enum | Dropdown | "options": [["Across", 0], ["Along", 1]] | Picks which code is used (see below) |
tex | Texture slot | optional "preview": white, mask, detail, height, normal, matcap | XSF_SAMPLE(_MyTex, uv) |
Dropdowns that switch code
An enum can choose between different versions of a stage. Give the stage a switch and one piece of code per option. Only the chosen code ends up in the shader, so it costs nothing on Quest. This is the second Neon Pulse effect:
{
  "id": "neonStripes", "cat": "neon", "label": "Neon stripes",
  "desc": "Painted stripes across or along the model.",
  "params": [
    { "id": "_NsColor", "label": "Stripe color", "type": "color", "def": [1, 0.2, 0.8, 1] },
    { "id": "_NsCount", "label": "Count", "type": "range", "min": 1, "max": 40, "def": 10 },
    { "id": "_NsDir", "label": "Direction", "type": "enum", "options": [["Across", 0], ["Along", 1]], "def": 0 }
  ],
  "surface": {
    "switch": "_NsDir",
    "cases": [
      "float nsS = step(0.5, frac(d.uv.w * _NsCount));\ncol.rgb = lerp(col.rgb, _NsColor.rgb, nsS * _NsColor.a);",
      "float nsS = step(0.5, frac(d.uv.z * _NsCount));\ncol.rgb = lerp(col.rgb, _NsColor.rgb, nsS * _NsColor.a);"
    ]
  }
}
Moving the mesh
The third effect uses the vertex stage to push each vertex along its normal:
{
  "id": "neonWobble", "cat": "neon", "label": "Neon wobble",
  "desc": "The mesh gently wobbles to the beat.",
  "params": [
    { "id": "_NwAmount", "label": "Amount", "type": "range", "min": 0, "max": 0.2, "def": 0.03 },
    { "id": "_NwSpeed",  "label": "Speed",  "type": "range", "min": 0, "max": 20,  "def": 6 }
  ],
  "vertex": "p += nrm * sin(t * _NwSpeed + p.y * 8.0) * _NwAmount;"
}7Helper functions
Need noise or cells? List the helper in "helpers" and Shader Forge adds its function to the shader, only when your effect is switched on.
"helpers": ["noise", "voronoi"],
"surface": "float lvN = XSFFbm(d.uv.zw * 6.0 + t * 0.2);\nfloat3 lvV = XSFVoronoi(d.uv.zw * 8.0, t);\ncol.rgb *= 0.6 + 0.4 * lvN;"
| helpers | Functions you get |
|---|---|
noise | XSFNoise(float2) smooth noise 0–1, XSFFbm(float2) layered cloudy noise |
noise3 | XSFNoise3(float3) 3D noise, good with world position |
voronoi | XSFVoronoi(float2 p, float time), which returns x = distance to the nearest cell, y = the second nearest, z = a random id. Use y - x for cracks. |
hex | XSFHex(float2), which returns x = distance to the hexagon edge, yz = cell id |
hash | XSFHash11, XSFHash21, XSFHash22, XSFHash31: random numbers from a position |
rotate | XSFRotate(float2 p, float angle) |
hue | XSFHueShift(float3 color, float amount) |
lum, overlay, ign | XSFLum(color) brightness, XSFOverlay(a, b) blend mode, XSFIGN(pixel) dither noise |
8Add a preset
A preset is a saved set of settings. Put it in presets. It can use your effects and the built-in ones, and values only needs the settings you want to change.
"presets": [
  {
    "name": "Neon club ball",
    "cat": "Neon Pulse",
    "config": {
      "name": "Neon/ClubBall",
      "lighting": "toon",
      "blend": "opaque",
      "features": { "neonPulse": true, "neonStripes": true },
      "values": { "_Color": [0.08, 0.05, 0.15, 1], "_NpColor": [1, 0.3, 0.9, 1], "_NsColor": [0.2, 0.9, 1, 1], "_NsCount": 16 }
    }
  }
]| config field | Values |
|---|---|
name | The Unity shader name, e.g. "Neon/ClubBall" |
lighting | unlit, lambert, halfLambert, toon, pbr |
blend | opaque, cutout, alpha, premultiply, additive, softAdditive, multiply |
features | { "effectId": true } for every effect that's on |
values | Any param id and its value. The built-in base color is _Color. |
Shortcut: set up a shader in Shader Forge, then use Share as preset (.xsfpreset). The file's config part is exactly what goes here.
9Add an app theme
Themes restyle Shader Forge itself. Each one is a list of CSS colors, and anything you leave out keeps its default.
"themes": [
  {
    "id": "neon-night", "name": "Neon Night", "dark": true,
    "vars": { "--bg": "#0d0b1a", "--panel": "#15122a", "--panel-2": "#1d1938", "--line": "#2d2752",
              "--text": "#f1ecff", "--muted": "#a79fd0", "--accent": "#ff4fd8" }
  }
]
Useful keys: --bg, --panel, --panel-2, --panel-3, --line, --line-2, --text, --muted, --faint, --accent, --preview-bg, --code-bg, --gutter-bg and the code colors --syn-k, --syn-fn, --syn-num, --syn-str, --syn-com. Pick your theme in Settings › Look.
10Add a command (script)
The script field is JavaScript. It runs once when the plugin loads, with an xsf object you use to add commands:
xsf.addCommand({
  label: 'Neon: random glow color',
  icon: '💡',
  run() {
    const c = xsf.getConfig();                 // a copy of the current shader settings
    c.values._NpColor = [Math.random() * 2, Math.random() * 2, Math.random() * 2, 1];
    xsf.setConfig(c);                          // apply them (the user can undo)
    xsf.toast('New glow color!');
  }
});
In the file it's one JSON string. Use \n for new lines:
"script": "xsf.addCommand({ label: 'Neon: random glow color', icon: '💡', run() {\n const c = xsf.getConfig();\n c.values._NpColor = [Math.random() * 2, Math.random() * 2, Math.random() * 2, 1];\n xsf.setConfig(c);\n xsf.toast('New glow color!');\n} });"| xsf… | Does |
|---|---|
addCommand({ label, icon, run }) | Adds a command to the Plugins menu and the command palette |
getConfig() / setConfig(cfg) | Read or replace the current shader settings |
effects(), categories() | List every effect (with its params) and category |
registerEffect, registerPreset, registerTheme, registerCategory | Add things from code, for example generated variations |
addCodeTransform(fn) | fn(code, cfg) gets the final Unity shader text and returns a changed version |
generate(cfg) | Returns the Unity shader for any settings |
toast(text), copy(text) | Show a message, or copy text to the clipboard |
Script plugins start switched off on other people's computers. They turn it on in the Plugin manager, where it's marked "runs a script". Keep scripts small and do only what the label says.
11Test it & fix errors
- Save the file, then click Reload plugins in the Plugin manager.
- Look at your plugin in Plugins › Plugin manager. Each plugin shows what it added. If something is wrong, you'll see the error and the exact line of shader code that failed. A broken effect is skipped, and the rest of your plugin still loads.
- Switch your effects on, move every slider, and try all three pipelines (Built-in / URP / HDRP) at the top.
- Check the Quest meter. Noise, cells and texture reads cost the most.
| Message | Fix |
|---|---|
| param id must start with _ | Rename it, e.g. _NpSpeed |
| param is already used by another effect | Use a more specific prefix |
| unknown category | Set cat to your category.id or a built-in one |
| cannot convert from 'const int'… | A number is missing its dot: 2 → 2.0 |
| redefinition of 'w' | Two effects use the same local name. Add your prefix. |
| The file doesn't load at all | The JSON is broken (often a missing comma or a stray quote). Paste it into a JSON checker. |
Bonus: effects that only use the vertex, base, surface, emit, post and alpha stages also work as layers. That means people can stack them on top of any Unity shader they open in Shader Forge.
12Share it
- In the Plugin manager, click Export next to your plugin to save a copy anywhere.
- Others install it by dragging the
.xsfpluginfile onto Shader Forge, or with Plugins › Install plugin… - Shaders made with your effects remember that they need your plugin. When someone opens a shared preset without it, Shader Forge tells them which plugin is missing.
- Bump
versioneach time you share an update.
Want your plugin in the Plugin Store? Submissions open when the store does.
13Try it: plugin maker
Fill this in to generate a working one-effect plugin. Then download it and drag it onto Shader Forge.
Next steps: open the finished Neon Pulse plugin to see everything from this page in one file, or look at the plugins in the store for ideas.